There are four things that your audiologist went over with you during the fitting that are important to remember:
- Batteries are toxic. Please keep batteries away from children’s and pets’ reach. Due to their toxicity, batteries should be recycled. (If you want, you can bring your batteries to us and we will recycle them for you.) In the event that someone swallows a battery, call the battery hotline (202-625-3333) immediately to find out what to do.
- Your child should be wearing the hearing aid(s) during ALL waking hours, with the exception of when they are taking part in a water activity like bathing, swimming, etc.
- If your child wears two hearing aids, it is VERY important you put the correct hearing aid in the correct side. Remember, RED is for right, BLUE is for left. Look for the color marker, which is usually located in the battery door or somewhere close to it. Make sure you are also connecting the right earmold to the right hearing aid and the left earmold to the left hearing aid.
- You should be placing the hearing aid(s) in the Dri-Aid Kit (hearing aid dehumidifier) EVERY night. Make sure that the desiccant crystals are still active (based on their color); otherwise, they will not be removing the moisture from the hearing aid(s). For more information on the Dry-Aid Kit, go to the “Dry-Aid Kit” section.
BEFORE YOU PUT THE HEARING AID(S) ON YOUR CHILD:
We know that life can be hectic, but if you want to make sure that your child is hearing correctly with their hearing aid(s), then you should follow the next steps every day:
- Check that the battery is working: Make sure you test the batteries every night with a battery tester (see fig. 1). Testing them at that time will give you a more accurate reading of their power. (Batteries hold a charge when they are not used for a long period of time and therefore can show more power in the morning than they actually have.) If the battery power is less than 60 percent, change it; otherwise, it will die in the middle of the day. For more information on batteries, please refer to the “Batteries” section.

Fig. 1
- Check that the hearing aid is working: A quick way to know if the hearing aid is working is by cupping the hearing aid in your hand and listening for feedback (whistling). If you can hear the feedback, then you know the hearing aid is working. However, it is important to know that this does not mean that the hearing aid is working well. For that, you still need to do a listening check as described in the next step.
- Make sure the hearing aid sounds well and is not distorting: In order to know if the hearing aid sounds well, you need to listen to it at the time your child first gets it so that you know how it should sound. At the time of the fitting, you were given a stethoset or listening tube. (If your child is old enough to let you know when the hearing aid is not working properly, you might not have received a stethoset.) Use the stethoset (see fig. 2) to listen to the hearing aid and listen for any distortion and/or crackling sound. You can use the Ling sounds (/aa/, /oo/, /ee/, /s/, /sh/, /m/) in order to know that there is no distortion at any of the important pitches/frequencies for speech.
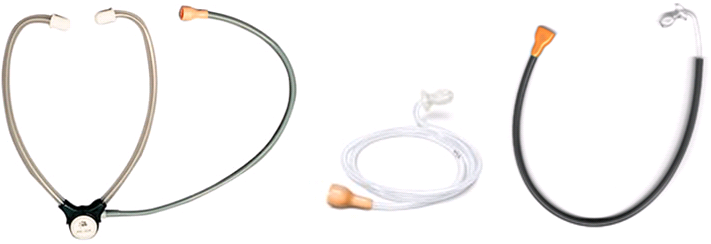
Fig. 2
- Make sure that the earmold is not clogged with earwax. If your child wears an in-the-ear hearing aid or a receiver-in-the-canal hearing aid, make sure that the wax trap is not full of earwax. For more information on earmolds, see the “Earmolds “section. For more information on wax traps, see the “Wax Trap” section.
- Complete a visual check of the hearing aid and earmold:
- Check the microphone filters and make sure they are not dirty or clogged.
- Make sure there are no cracks, chips or tears on the hearing aid or the earmold.
- Make sure the tubing of the earmold is still flexible and that the earmold fits your child’s ear without any gaps around it.
- Check the battery door for corrosion and make sure it closes properly.
BATTERIES:
- Remember, batteries are toxic and therefore should be kept away from children and pets and should be recycled. For more information, see the first section of the page.
- Batteries come with a sticker attached to them. This sticker allows for the batteries to have a longer shelf life. Do not remove this sticker until you need to use the battery.
- When changing the battery, make sure you let it air for two to five minutes after taking the sticker off and before placing it in the hearing aid. This will likely lengthen the life of the battery.
EARMOLDS:
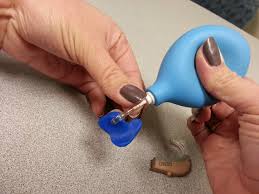
Figure 3
Washing the earmolds:
- Disconnect the earmold from the hearing aid. DO NOT separate the earmold from the tube.
- Wash the earmolds at night with lukewarm water and hand soap.
- Let water into the tube and make sure that water comes out on the other end. If it doesn’t then it is possible that the earmold is clogged with earwax. To unclog it, use the earmold blower (see fig. 3).
- Let the earmold air dry during the night. Do not place wet earmolds into the Dry-Aid Kit.
How to insert an earmold:
-
-
- Hold the earmold upright, with the canal portion pointed towards the ear canal. Grasp the mold between your thumb and index finger.
- Place the earmold into the ear canal. If it is difficult to get into place, stretch the ear by pulling it gently backwards and upwards with your other hand.
- Rotate the earmold backwards so that it locks into place. Place the hearing aid behind the ear, being careful not to twist the tube.
- Check the placement of the mold by gently pressing on it to ensure fit. Make sure all the parts of the earmold are “tucked in” and that there is nothing sticking out. You may now turn the aid on.
-
HEARING AID DRY-AID KIT (DEHUMIDIFIER):
The Dry-Aid Kit will help prolong the hearing aid(s) life as it removes humidity from the hearing aids. As with any electronic, humidity is one of the main causes for a hearing aid to stop working.
In order for the Dry-Aid Kit to do its job, the desiccants (crystals) need to be active. You will know if they are active or not depending on their color. Since each Dry-Aid Kit is different, please refer to the Dry-Aid Kit instructions in order to know the color that the crystals have when they are still active. Some desiccants can be re-activated in the microwave oven or conventional oven; others are a one-time use only. Please refer to the instruction manual or ask your audiologist to know which one is the one you have.
EARMOLD BLOWER
An earmold blower will allow you to blow moisture away from the inside of the earmold tubing, and/or help you in blowing earwax out of the earmold. See fig. 3
WAX TRAPS
If your child has an in-the-ear or receiver-in-the-ear hearing aid, it is likely that the hearing aid has a wax trap (see fig. 4). Wax traps, as the name implies it, trap earwax preventing it from going into the hearing aid or the hearing aid receiver. Make sure you check it every night and if clogged, change it for a new one. There are different types of wax traps. When you come to the clinic to get more, please bring the previous package so that we know which ones to give you.
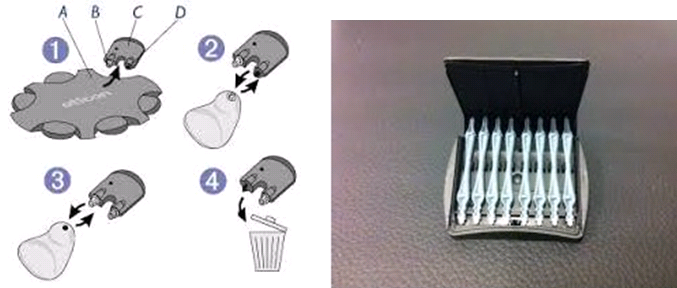
Fig. 4
RETENTION SOLUTIONS
You can use one or more of these options:
-
-
-
- Retention cord(s): A retention cord is usually one or two cords attached to a clip of some kind (see fig. 5). On the other end of the cord, there is either a loop or ring you can place around the hearing aid. The clip is for you to clip it to your child’s clothing. With the retention cord(s) if the hearing aid comes off the ear, it will stay dangling from your child’s clothing.
-
-

Fig. 5
-
-
-
- Toupee tape: This is a double sided tape that will allow you to “tape” your child’s hearing aid to their head’s skin, making it harder for it to fall off. See fig. 6
-
-
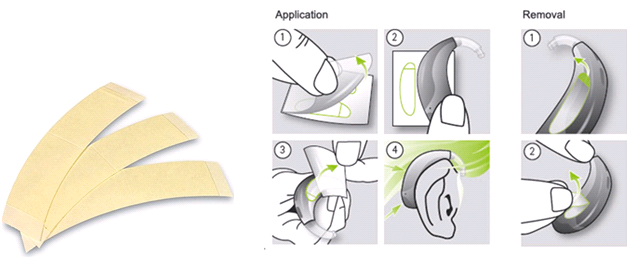
Fig. 6
-
-
-
- Elastic headband: There are headbands you can place around the head and ears that could prevent the hearing aids from coming off your child’s ears. It is important that the headband is made of a material through which sound can travel without being damped. See fig. 7.
-
-
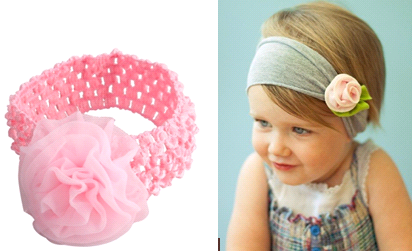
Fig.7
-
-
-
- Bonnet: You can use a bonnet over the head and ears to make it harder for your child to take off the hearing aids. Just as with the headband, make sure the bonnet is made out of a material that allows the sound to go through it without it being damped. See fig. 8
-
-
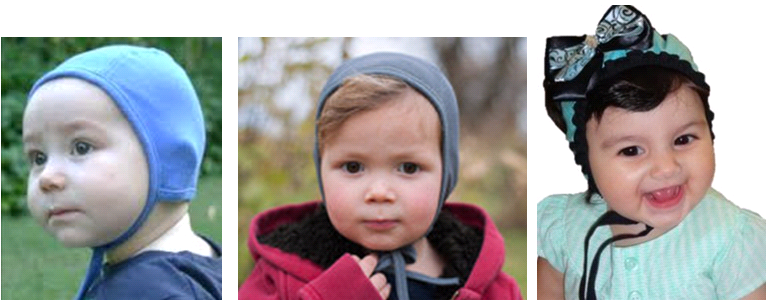
Fig. 8